
Apple’s AirPods can be paired with a Windows 10/11 PC via Bluetooth, just like an iPhone or iPad.
However, there are cases where the AirPods that have been paired are suddenly disconnected. There are also cases where the connection is frequently disconnected even after reconnecting.
This article will explain what to do when AirPods Keep Disconnecting from Windows 10/11 PC.
Table of Contents
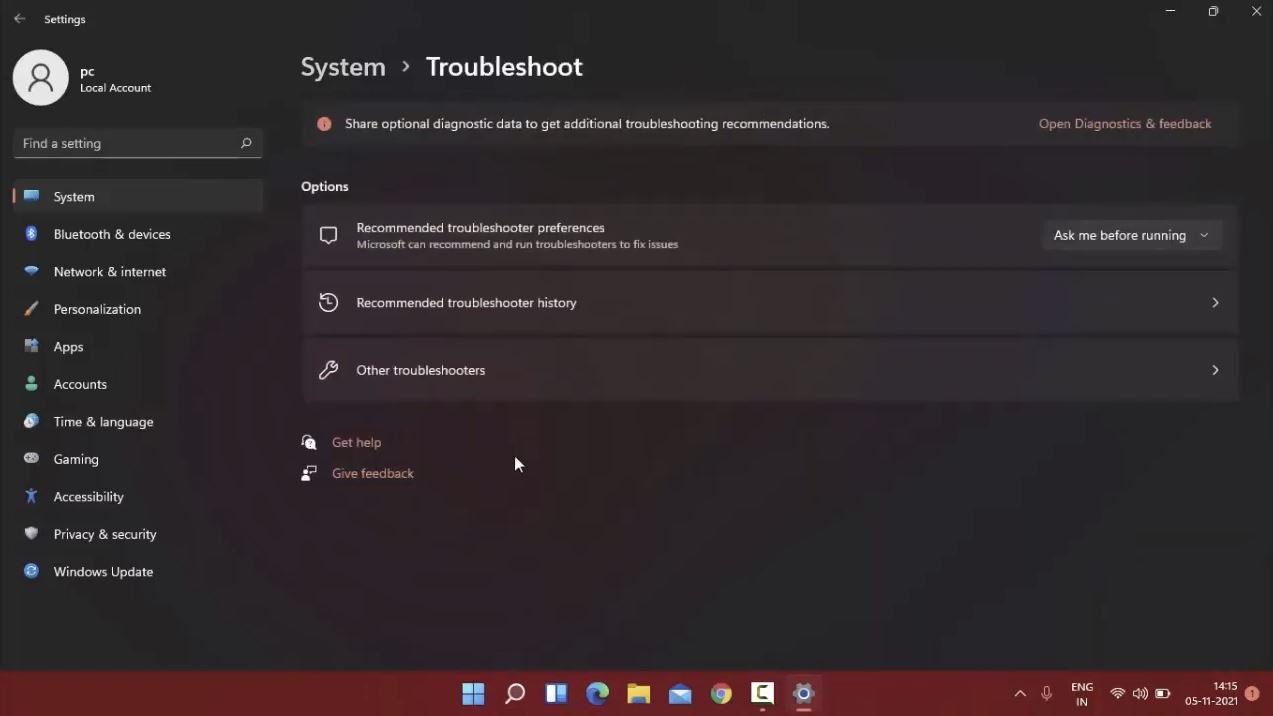
Method 1: Run the Bluetooth troubleshooting tool
Windows has a troubleshooting tool that can automatically fix Bluetooth problems.
Therefore, running a Bluetooth troubleshooting tool may solve the AirPods disconnection issue.
To run the Bluetooth troubleshooting tool, follow the steps below.
- Right-click on “Windows Mark” and select “Settings“.
- Click Update & Security.
- For Windows 11, click “System“.
- Click “Troubleshoot“.
- Click Additional Troubleshooting or Other Troubleshooting in the right pane.
- Select Bluetooth and click Run Troubleshooter.
- Follow the instructions to detect and fix the problem.


Once you’ve run the troubleshooter, check if the AirPods disconnect issue has been resolved.
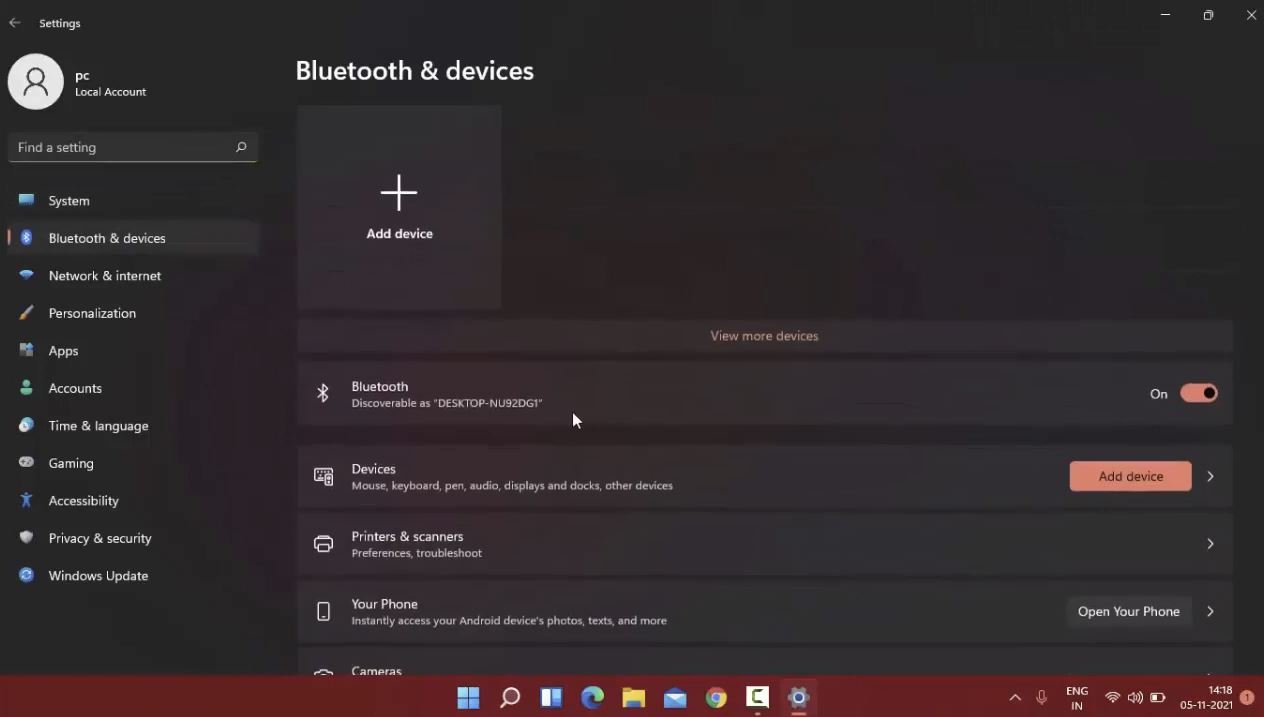
Method 2: Disconnect unwanted Bluetooth devices
If you have multiple Bluetooth devices connected to your PC, another Bluetooth device may interfere, and your AirPods disconnect.
Therefore, ensure that the AirPods problem is not resolved with all unnecessary Bluetooth devices disconnected.
Follow the steps below to disconnect unwanted Bluetooth devices.
- Right-click on “Windows Mark” and select “Settings“.
- Click Devices >> Bluetooth and Other Devices.
- For Windows 11, click Bluetooth & Devices.
Select the connected “Unnecessary Bluetooth device” and click “Disconnect“.
- For Windows 11, click the “3-point icon” to the right of “Unnecessary Bluetooth devices” and select “Disconnect“.
Follow the same procedure to disconnect all unwanted Bluetooth devices.
If you can disconnect all unnecessary Bluetooth devices, check if the problem of disconnecting AirPods has been resolved.
Method 3: Restart your PC
It is possible that the AirPods connection will be disconnected without permission due to a temporary malfunction in the Windows system.
So try restarting your PC and see if the AirPods issue goes away. Click the Windows mark, click the power icon, and select Restart to restart your PC.
Check if your AirPods are no longer disconnected after your PC restarts. If restarting your PC does not resolve the issue, proceed to the next solution.
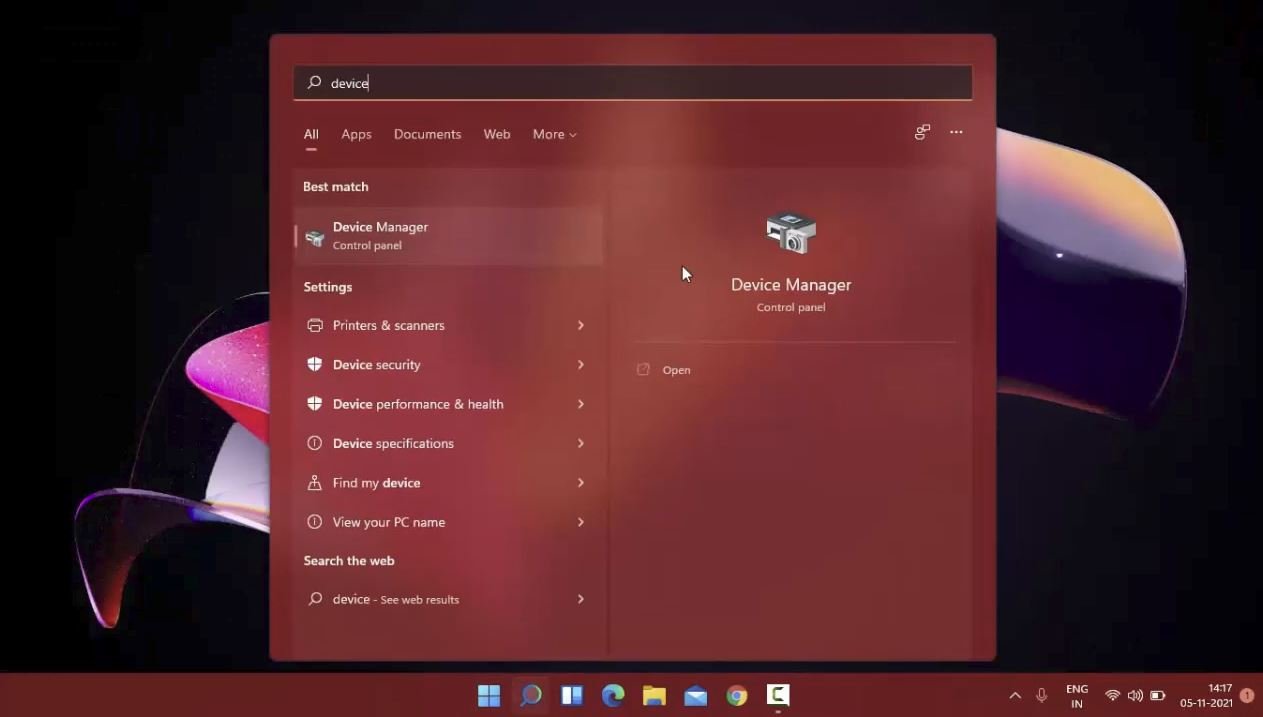
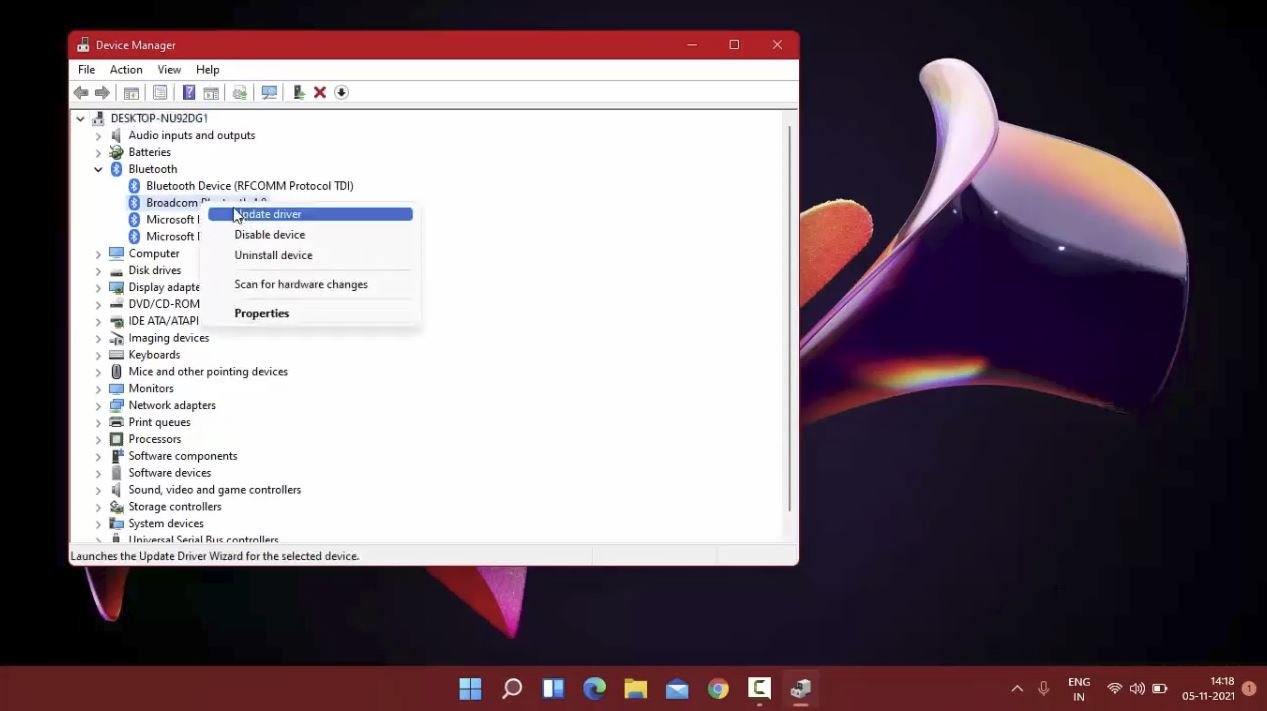
Method 4: Update the AirPods driver
Your AirPods may be frequently disconnected due to an old and defective AirPods device driver.
Therefore, updating your AirPods device driver to the latest version may resolve the issue. Follow the steps below to update your AirPods driver.
- Right-click on Windows Mark and select Device Manager.
- When Device Manager starts, double-click the “Bluetooth” tree to expand it.
- Right-click on AirPods Model Name in the tree and choose Update Driver.
- Click “Search for drivers automatically“.
- If a new driver is found, it will be installed automatically.
After updating the AirPods driver, ensure that the AirPods disconnect issue has been resolved. If that doesn’t work, or the driver is already up-to-date, proceed to the next solution.
Method 5: Run Windows Update
The AirPods may be frequently disconnected due to an old version of Windows and a defect.
Therefore, if updating the AirPods driver does not resolve the issue, try running Windows Update to bring Windows up to date.
Follow the steps below to run Windows Update.
- Right-click on “Windows Mark” and select “Settings“.
- Click Update & Security >> Windows Update.
- For Windows 11, click Windows Update in the left pane.
- Click Check for Updates in the right pane.
- If new updates are found, they will be installed automatically.
- If you see a “Restart” or “Download” button, click it to apply the update.
- After the installation is complete, make sure Windows is up to date.
If you can update Windows by running Windows Update, ensure your AirPods issue is resolved.
Method 6: Pair your AirPods again
Your AirPods may be disconnected due to a problem with your AirPods pairing.
Therefore, unpairing the AirPods and then re-pairing may solve the disconnect problem.
To pair your AirPods again, follow the steps below.
- Right-click on “Windows Mark” and select “Settings“.
- Click Devices >> Bluetooth and Other Devices.
- For Windows 11, click Bluetooth & Devices.
- Select AirPods Model Name and click Remove Device.
- For Windows 11, click the “3-point icon” to the right of “AirPods model name” and select “Delete device“.
- Click Yes if a confirmation pop-up appears.
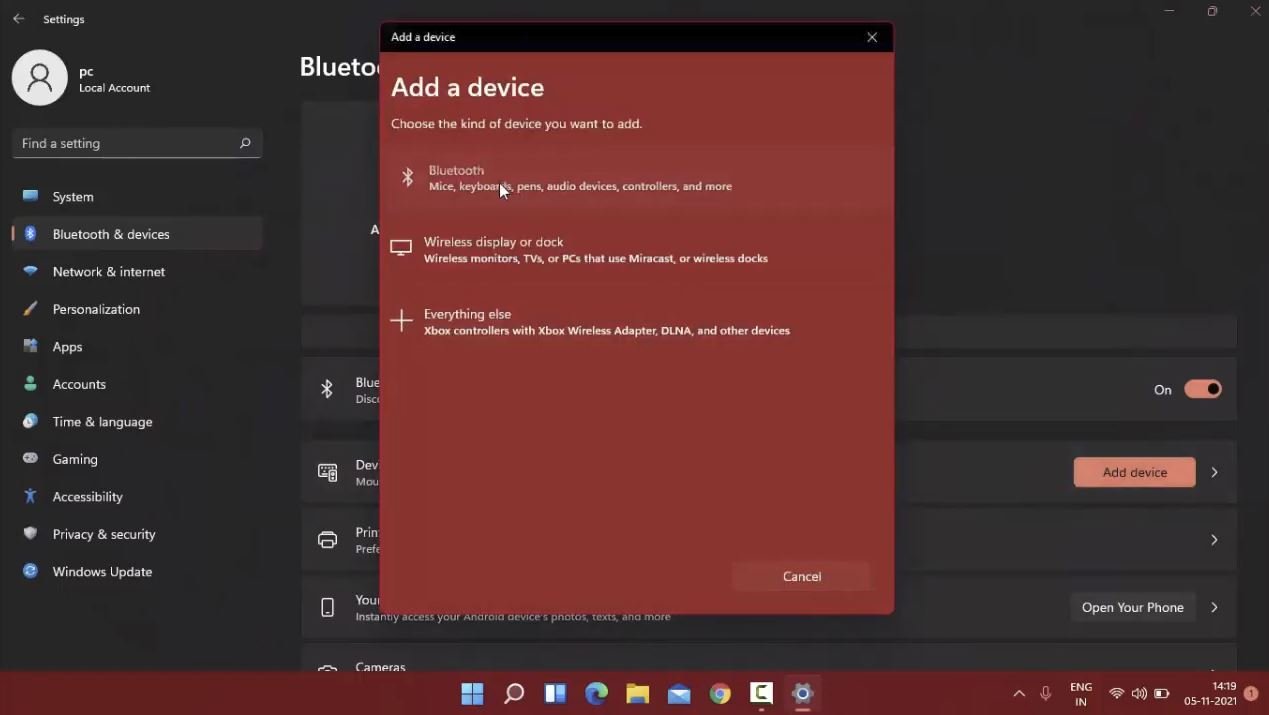
- Click “Add Bluetooth or other device“.
- For Windows 11, click Add Device.
- Follow the instructions on the screen to detect the Bluetooth device.
- With the case lid containing the AirPods open, press and hold the button on the back of the case, and release it when the status lamp flashes white.
- When “AirPods” appears in the list of connectable devices, select it.
With the above steps, you can pair your AirPods again. After pairing is complete, check if the AirPods expired issue has been resolved.
Method 7: Disable AirPods power saving settings
The AirPods may be disconnected because the power saving setting of the AirPods device driver is enabled.
Therefore, disabling the power saving settings in the AirPods device driver may resolve the issue. To disable the power saving setting of the driver, follow the procedure below.
- Right-click on Windows Mark and select Device Manager.
- When Device Manager starts, double-click the “Bluetooth” tree to expand it.
- Right-click AirPods Model Name in the tree and choose Properties.
- Open the Power Management tab and uncheck “Allow the computer to turn off this device to save power“.
- Click OK to save your settings.
If you can disable the power saving setting in your AirPods device driver, make sure your AirPods are no longer disconnected.
Method 8: Change the power plan settings
There may be cases where the AirPods are frequently disconnected due to the power saving of the PC power plan.
Therefore, check the power plan settings and change the power saving plan if set. To change the power plan settings, follow the steps below.
- Right-click on Windows Mark and select Run.
- Enter “control” for the name and click “OK“.
- When the control panel starts, switch the display method on the upper right to “icon“.
- Click Power Options.
- If “Power Saving” is selected in the list of power plans, change it to “Balance” or “High Performance“.
If you can change the power plan settings, check if the AirPods disconnect issue has been resolved.

