Building a custom mechanical keyboard can be a fun and rewarding project for anyone who is interested in personalizing their typing experience. Whether you’re a gamer, a writer, or simply enjoy typing on a keyboard, building your own mechanical keyboard can give you a unique and satisfying typing experience.
In this guide, we will go through the steps involved in building a custom mechanical keyboard, from choosing the right components to assembling the keyboard itself.
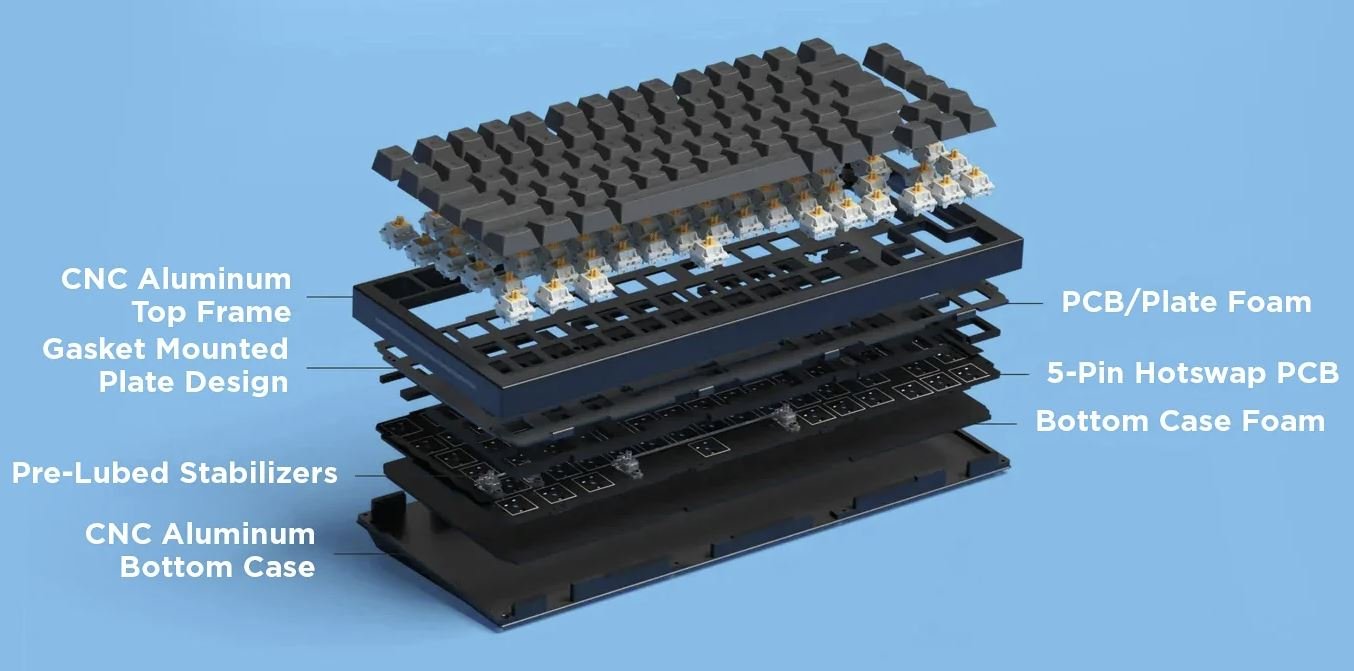
Every custom mechanical keyboard consists of several key components, including the case that houses all the parts, the PCB (printed circuit board) that enables communication with your computer, the plate that holds your switches in place, stabilizers for longer keys such as spacebar and enter, the switches that connect to your PCB, and the keycaps that make up the face of your keyboard.
You can often purchase the case, PCB, and plate as a keyboard kit, while the stabilizers, switches, and keycaps are typically sold separately. Additionally, there are optional components that you can buy for your custom keyboard.
Step 1: Choose Your Keyboard Layout
The first step in building a custom mechanical keyboard is to choose the keyboard layout you want to use. There are many different layouts available, including the popular full-size, tenkeyless (TKL), and 60% layouts. Each layout has its own pros and cons, so it’s important to choose the one that best suits your needs.

Step 2: Select Your Switches
The switches are the heart of any mechanical keyboard. They are responsible for the tactile feedback and sound when you press a key. There are many different types of switches available, each with their own unique characteristics. Some popular switches include Cherry MX, Gateron, and Kailh switches. When selecting switches, it’s important to consider factors such as the actuation force, the tactile feedback, and the sound.
There are three main types: linear, clicky, and tactile.
- Linear: Linear switches have a smooth and consistent keystroke, with no tactile feedback or clicking sound.
- Tactile: Tactile switches have a bump or tactile feedback when you press down on the key.
- Clicky:Clicky switches have both tactile feedback and an audible clicking sound when you press down on the key.
When choosing a switch, it’s important to consider your personal preferences and typing style. Factors to consider include the amount of force required to press down on the key, the sound produced, and the feedback provided. You can also consider the material of the switch, with some switches made of materials such as gold, silver, or copper to provide a more durable and responsive typing experience.
In summary, keyboard switches play a crucial role in determining the feel and sound of a keyboard. The choice of switch should be based on personal preferences, typing style, and the desired use of the keyboard. With so many options available, it’s important to do your research and try out different switches to find the one that suits you best.
Step 3: Choose Your Keycaps
Keycaps are the part of the keyboard that you actually touch when you type. They come in many different shapes, sizes, and materials, and can have a significant impact on the feel and sound of your keyboard. Some popular keycap materials include ABS, PBT, and even metal. It’s important to choose keycaps that match your preferred typing style and aesthetic.
Step 4: Select Your PCB
The PCB, or printed circuit board, is the brain of the keyboard. It’s responsible for translating your keystrokes into digital signals that can be understood by your computer. When selecting a PCB, it’s important to consider factors such as compatibility with your chosen switches and layout, as well as features such as RGB lighting and programmability.
Step 5: Choose Your Case
The case is the outer shell of the keyboard, and it can have a significant impact on the overall look and feel of your custom keyboard. Cases come in many different materials, including plastic, aluminum, and even wood. It’s important to choose a case that is compatible with your chosen layout and PCB, and that matches your preferred aesthetic.
Step 6: Assemble Your Keyboard
Once you have selected all of the components for your custom mechanical keyboard, it’s time to assemble them. This can be a challenging process, especially if you are new to building keyboards. It’s important to follow the instructions carefully and to take your time. Many components, such as switches and keycaps, require delicate handling to avoid damage.
There are several tools you will need, including a precision screwdriver, lubricant, a small brush, tweezers, keycap and switch pullers, and a soldering iron if required by your PCB. For beginners, a hot-swap PCB is recommended, which allows for easy installation and replacement of switches without soldering.

Before assembly, it’s important to test your PCB to ensure it functions properly. Connect it to your computer and use key testing software to test each key. If something isn’t working, contact the manufacturer for a replacement.
Step 7: Mounting
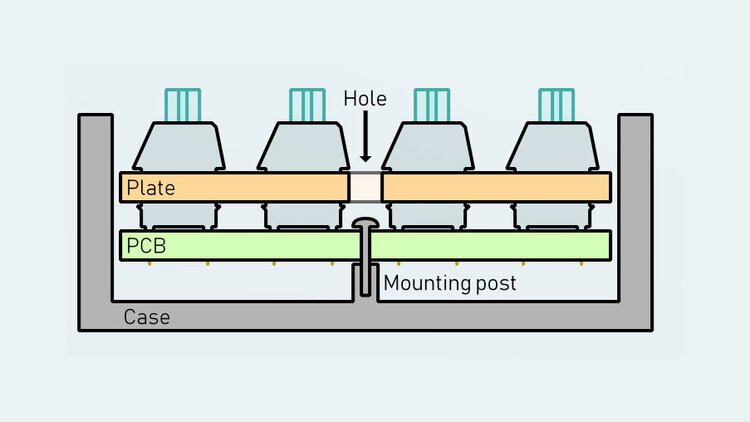
Mount the PCB and plate to your case according to your desired mounting style. The mounting style can impact the final sound and feel of your keyboard. Slide the provided silicone plate caps onto the plate and fasten it onto the top housing of the case. Install rubber feet onto the bottom of the case for added grip and protection. Optional weights can be added for aesthetic purposes. Finally, attach your keycaps and enjoy your new custom mechanical keyboard.
Types of Mounting Styles:
Gasket-Mount

Integrated-Plate

Sandwich-Mount

Bottom-Mount

Top-Mount

Tray-Mount
Step 8: Test and Customize
After you have assembled your keyboard, it’s important to test it to ensure that all of the components are working properly. Once you have confirmed that everything is working correctly, you can begin customizing your keyboard. This might involve programming the keys to perform specific functions, or adding custom lighting effects.
Conclusion!
Building a custom mechanical keyboard can be a challenging but rewarding project. By following the steps outlined in this guide, you can create a keyboard that is perfectly suited to your typing style and aesthetic preferences. Whether you’re a gamer, a writer, or simply enjoy typing on a keyboard, a custom mechanical keyboard can give you a unique and satisfying typing experience.