When you try to set up an email account or send or receive an email in Microsoft Outlook, you may get an “Unable to connect to server” or “Server not available” error.
If this error occurs, you will not be able to send or receive emails with the set account, so you need to take corrective action.
This article will explain what to do if you get an error that Outlook cannot connect to the server. The action is assumed to be Windows 2013/2016/2019.
Method 1: Turning Off Work Offline
It is possible that Outlook is working offline, causing an error that prevents you from connecting to the server when sending or receiving email.
Therefore, make sure that Outlook is not working offline. To cancel offline work, follow the procedure below.
- Start Outlook.
- Click the Send / Receive tab.
- If “Work Offline” is “On”, click it to cancel it.

If you can cancel Outlook offline work, send and receive emails again to confirm that the error has been resolved.
Method 2: Repair your email account settings
You may have an error that prevents you from connecting to the server due to a problem with your Outlook email account settings.
Therefore, repairing your email account settings may resolve the issue. To repair your email account settings, follow the steps below.
- Start Outlook.
- Click the File tab.
- Select Information in the left pane.
- Click Account Settings in the right pane and select Account Settings.
- Select the email account you want to repair and click Repair.
- Follow the instructions in the pop-up that appears to perform the repair process.
- Click Finish when you see “Account has been successfully repaired“.

If your account can be successfully repaired, you will receive a test email called “Microsoft Outlook Test Message”. If you receive the test email successfully, check if the error that you cannot connect to the server has been resolved.
Method 3: Reset your email account
There may be a case where the error that cannot connect to the server occurs due to an error in the information of the mail account set in Outlook.
Therefore, please delete the mail account settings and then set them again. The mail account setting information can be found on the help page or management page of the mail server or the account used.
To reset your Outlook email account, follow these steps:
- Start Outlook.
- Click the File tab.
- Select Information in the left pane.
- Click Account Settings in the right pane and select Account Settings.
- Select “Email account with error” and click “Delete”.
- Note : If you have set up your account with POP, be aware that deleting your account will erase any emails you have received.
- Click Yes when the confirmation pop-up appears.
- Once you have deleted your account, click New.
- Enter your email address correctly, click “Advanced Options”, check “Set up your account manually” and click “Connect”.
- Click POP or IMAP.
- If you want to set up webmail, click “Service name of your email account (such as Google)”.
- Enter the correct server, port, and encryption method in “Incoming mail” and “Outgoing mail” and click “Next”.
- Server : Enter the “host name (smtp.mail.jp, etc.)” listed on the mail server management page.
- Port : Enter “587” if the encryption method is “None” or “STARTTLS”, or “465” if it is “SSL / TLS”.
- Encryption method : Select the encryption method described on the mail server administration page.
- When the message “Account was successfully updated” is displayed, click “Finish”.
After resetting your email account, check if you can send and receive emails normally. If this method resolves the error, you can determine that it was due to a misconfigured account information.
Method 4: Restart Outlook
In some cases, you may not be able to connect to your mail server due to a temporary problem with Outlook.
Therefore, quit Outlook and restart it to see if the error that you cannot connect to the server is resolved.
If you still can’t connect to the server after restarting Outlook, go to the next solution.
Method 5: Check your PC’s internet connection
In some cases, Outlook may fail to connect to the server due to a problem with your PC’s internet connection.
Therefore, open a browser etc. and check if your PC can connect to the Internet.
If you have problems with your PC’s internet connection, restart your PC and router to see if the problem goes away.
Method 6: Disabling Extensions
There may be a problem with the add-in you are adding to Outlook that causes an error that prevents you from connecting to the server.
Therefore, if you have added add-ins to Outlook, please check if the error is resolved with all add-ins disabled. To disable the Outlook add-in, follow these steps:
- Start Outlook.
- Click the File tab.
- Select Options in the left pane.
- Select Add-ins in the left pane.
- Select COM Add-ins under Administration in the right pane, then click Settings.
- When the list of add-ins is displayed, clear the check boxes of all add-ins and click OK.
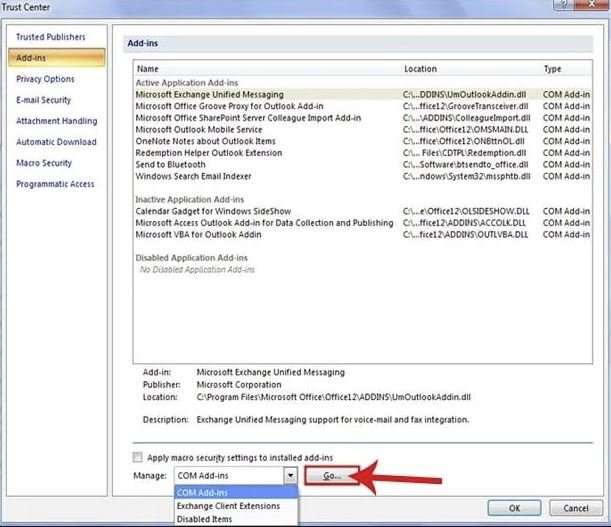
If you can turn off all add-ins, make sure you can connect to the server successfully. If you can access it successfully, turn the add-ins back on one by one to identify the offending add-in.
Method 7: Update Outlook and Windows
It is possible that you cannot connect to the server due to an old version of Outlook or Windows.
Therefore, please update Outlook and Windows to the latest version to see if the problem goes away. To update Outlook and Windows, follow these steps:
- Outlook update procedure:
- Start Outlook.
- Click the File tab.
- Click Office Account in the left pane.
- Click Update Options in the right pane and click Update Now.
- Windows update procedure:
- Right-click on “Windows Mark” and select “Settings”.
- Click Update & Security.
- Click Check for Updates in the right pane.
- If new updates are found, they will be installed automatically.
- If you see a “Restart” or “Download” button, click it to apply the update.
- After the installation is complete, make sure Windows is up to date.
After updating Outlook and Windows to the latest version, check if the Outlook error has been resolved.
Method 8: Rebuild the data file
You may get an error that you cannot connect to the server because the Outlook data file is corrupted.
So try rebuilding your Outlook data files to see if the problem goes away. To rebuild the data file, follow the procedure below.
- Start Outlook and click File in the top menu.
- In the right pane, click Account Settings> Account Settings.
- Select “Email accounts that do not have access to data files” and click “Change Folder”.
- Click New Outlook Data File.
- Set the save location and file name for the new pst file.
- Do not use the same name as an existing pst file.
- If you are not particular about it, there is no problem by clicking “OK” in the default state.
- The new data file is added to the tree. Press the “+” button to tree, select “Inbox” and click “OK”.
- Confirm that the delivery location of the new message has changed to the new pst file.
- Click Change Folder again.
- Select the Inbox of the original data file and click OK.
- Click Close to complete the settings.
After rebuilding the data file, send and receive mail to see if the error of not being able to connect to the server has been resolved.
Method 9: Repair Outlook
You may get an error that you cannot connect to the server because your Outlook application is corrupted.
Therefore, repair the Outlook application to see if the problem goes away. To repair your Outlook application, follow these steps:
- Right-click on “Windows Marks” and select “Apps and Features”.
- Select Microsoft Office (edition name) in the list of apps in the right pane and click Change.
- If User Account Control appears, click “Yes”.
- Select the “Online Repair” option and click “Repair”.
- Follow the wizard to complete the repair.
After repairing Outlook, check if the error that cannot connect to the server has been resolved.
Method 10: Recreate the Outlook profile
You may have an error that prevents you from connecting to the server because of a problem with your Outlook profile.
Therefore, recreate your Outlook profile to see if the error persists. However, you will need to recreate your profile and then reconfigure your email account.
To recreate your Outlook profile, follow these steps:
- Start Outlook and click the File tab.
- Click Account Settings → Manage Profiles.
- Click View Profile.
- Click Add, enter a profile name (Outlook2, etc.) and click OK.
- Click Cancel when the automatic account setup screen appears.
- Click OK when the profile creation confirmation dialog is displayed.
- Click the “Always use profile” select box, select “Created profile”, and click “OK”.
- NOTE: If you want to revert to the previous profile after making changes, select the original Outlook.
With the above steps, you can recreate your Outlook profile. If you can recreate it, reset your email account and see if the error is resolved.
Method 11: Reinstall Outlook
If you still get an error that Outlook cannot connect to the server after trying the solutions above, it is possible that Outlook has an unexplained problem.
Therefore, try uninstalling Outlook and then reinstalling it. However, uninstalling Outlook will erase your email data, so make a backup if necessary.
Please refer to the official page below for the procedure to uninstall Outlook.
After uninstalling Outlook, follow the normal procedure to install it again. After the reinstallation, set up your email account and see if the server connection error is resolved.