If you’re using an iPhone / iPad, you may suddenly see the “Update Apple ID Settings” message under your Apple ID username in the Settings app.
Normally, if you follow the instructions, the message will disappear, but in some cases, it may not be possible to update, or the message may be displayed many times.
In this article, we will explain in detail what to do when the message “Update Apple ID Settings” appears on your iPhone / iPad. We will also introduce what to do if you cannot update.
Why do you see “Update Apple ID settings.”
The “Update Apple ID Settings” message is displayed when your iPhone / iPad has not successfully signed in to your Apple ID.
The main causes for not being able to sign in to your Apple ID are:
- I changed the password I used to log in to my Apple ID
- Some information on your Apple ID is outdated and not updated
- Updated iOS to a new version
- There is a problem with the server-side of Apple ID
Most of the above are caused by changing your Apple ID password. If you change your password, enter the correct password and the message will disappear.
What if I don’t “update Apple ID settings”?
The “Update Apple ID Settings” message appears when you’re having trouble signing in to your Apple ID.
Therefore, if you do not update your Apple ID settings, Apple services that use your Apple ID may not work properly.
In particular, services such as the App Store, iCloud, iMessage, and FaceTime are often used on a daily basis, so it is recommended that you update your Apple ID settings when a message is displayed.
What to do when “Update Apple ID settings” is displayed
Try the following methods to update your settings if you see the “Update Apple ID Settings” message. We’ll also show you what to do if you can’t update your Apple ID settings in the normal way.
Method 1: Enter the correct password
If you see the “Update Apple ID Settings” message, basically enter the correct Apple ID password and the message will disappear.
If you change your Apple ID password and then get the message, enter the new password, you changed.
Follow the steps below to enter a new password for your Apple ID.
- Open the Settings app and tap the Update Apple ID settings message.
- Tap “Continue“.
- Enter your Apple ID password and tap Sign In.
- If you have enabled two-factor authentication, enter the verification code.
When you enter the correct password to sign in, the message disappears. If you’ve entered the correct password and still can’t update your Apple ID settings, go to the next solution.
Method 2: Sign in to your Apple ID again
If you’ve entered the correct password and still can’t update your Apple ID settings, signing out of your Apple ID completely and then signing in again may resolve the issue.
To sign out and sign back in from the Apple ID you’re using on your device, follow these steps:
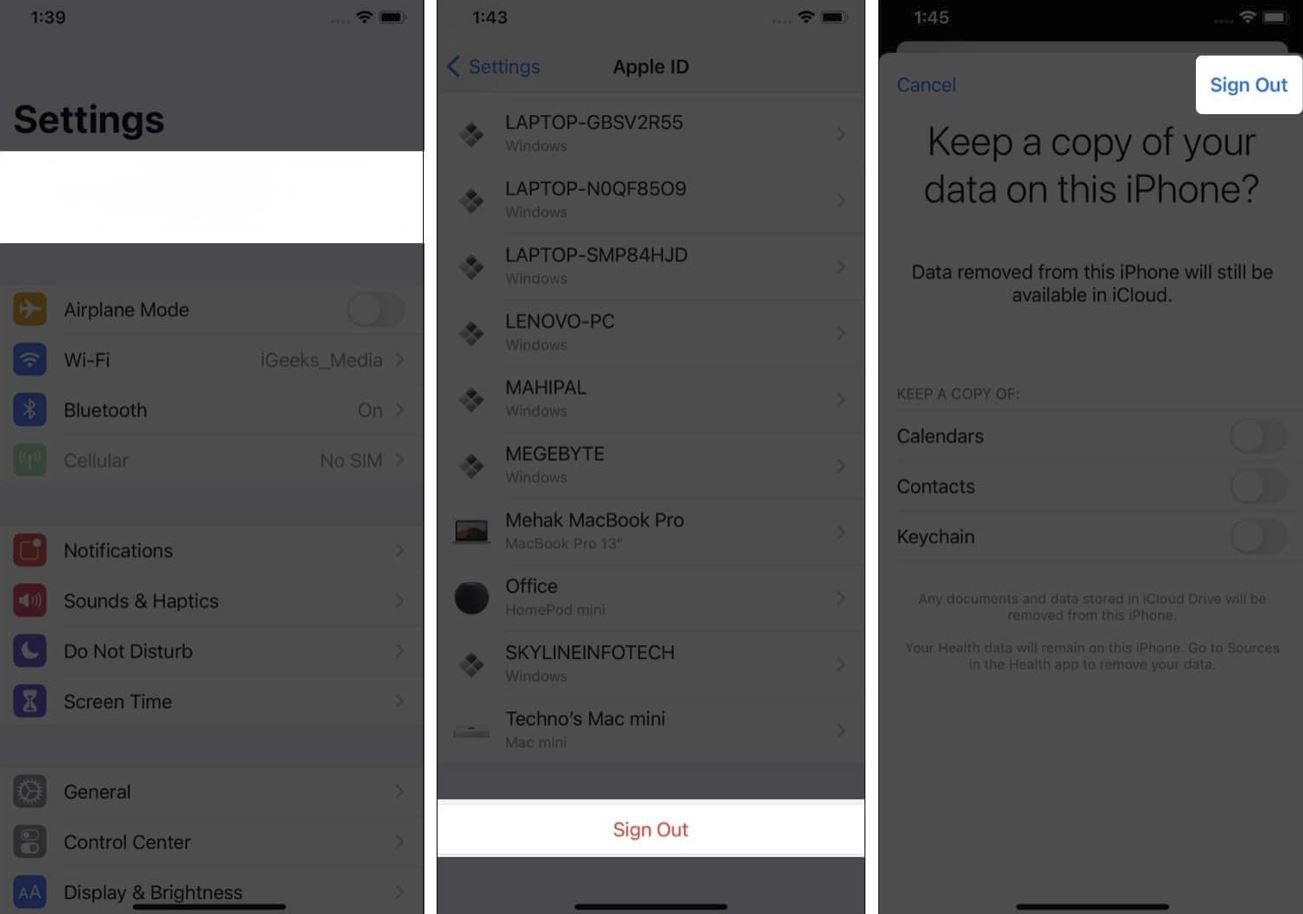
- Open the Settings app and tap your Apple ID username at the top.
- Scroll down and tap Sign Out.
- Enter your password and tap “Turn off” in the upper right corner.
- Tap “Sign out” without selecting the data you want to keep a copy of.
- Tap “Sign in to iPhone“.
- Enter your Apple ID “email address” and “password“.
- If you have enabled two-factor authentication, enter the verification code.
You can sign in to your Apple ID again with the above steps. After signing in, go back to the first screen of the Settings app and make sure the “Update Apple ID Settings” message disappears.
Method 3: Reconnect / change the network
There may be a case where you cannot update your Apple ID settings even if you enter the correct password because there is a problem with the network to which your iPhone / iPad is connected.
Therefore, switch the airplane mode and reconnect to the network to see if the problem goes away. To switch between airplane modes, follow the steps below.
Swipe down from the top right corner of the screen to display the Control Center.
- For iPhones with a home button, swipe up from the bottom edge of the screen.
When the Control Center is displayed, tap “Airplane mode (airplane icon)” to switch it to “On“.
Tap “Airplane mode (airplane icon)” again to switch it to “On“.
After switching between airplane modes and reconnecting to the network, check to see if your Apple ID settings can be updated successfully.
If switching between airplane modes does not resolve the issue, switching between Wi-Fi and mobile data connections may resolve the issue. Follow the steps below to switch between Wi-Fi and mobile data communication.
Swipe down from the top right corner of the screen to display the Control Center.
- For iPhones with a home button, swipe up from the bottom edge of the screen.
When the Control Center appears, tap Wi-Fi to toggle it on / off.
- Turn Wi-Fi on to switch to Wi-Fi, and turn it off to switch to mobile data communication.
Once you’ve changed the network you’re connecting to, check to see if your Apple ID settings can be updated successfully.
Method 4: Reboot the device
It is possible that your Apple ID settings cannot be updated properly due to a temporary problem with your iPhone / iPad.
Therefore, restart your iPhone / iPad and try updating your Apple ID settings again. To restart your iPhone / iPad, follow the steps below.
- iPhone X and above : Press and hold the Side Button and Volume Control Button at the same time and drag the power off slider. When the power is turned off, press and hold the “side button” to start it.
- iPhone 8 and earlier : Press and hold the “Side Button” and drag the power off slider. When the power is turned off, press and hold the “side button” to start it.
- iPad (without home button) : Press and hold the “side button” and “volume control button” at the same time, and drag the power off slider. When the power is turned off, press and hold the “side button” to start it.
- iPad (with home button) : Press and hold the “stop button” and drag the power off slider. When the power is turned off, press and hold the “stop button” to start it.
After restarting your device, try launching the Settings app to see if you can update your Apple ID settings.
Method 5: Update your Apple ID payment information
In some cases, you may see a message to update your Apple ID settings because the payment information on the card registered with your Apple ID has expired.
Therefore, please update or delete your Apple ID payment information to see if the issue persists. To update your Apple ID payment information, follow these steps:
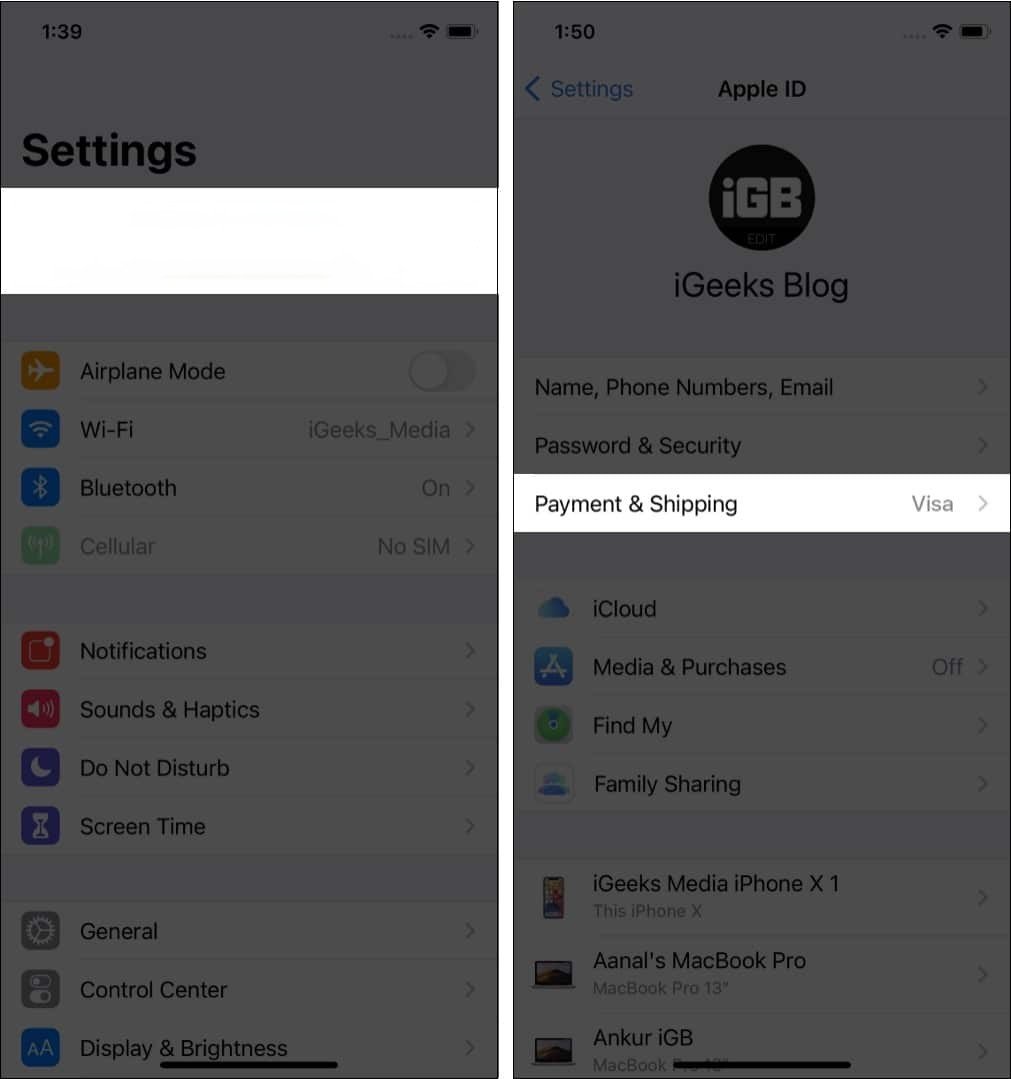
- Open the Settings app and tap your Apple ID username at the top.
- Tap “Payment & Shipping“.
- Enter Face ID (or Touch ID).
- Select “Expired Cards” in the list of payment methods.
- Update “Expiration Date” and “Security Code” and tap “Finish“.
- If you do not need the card information, tap “Edit” in the upper right and tap the “Delete” button of the card you want to delete.
If you can update or delete your payment information, restart your device and try updating your Apple ID settings again.
Method 6: Reset your Apple ID password
If you don’t know the correct password for your Apple ID and can’t update your Apple ID settings, reset and reset your password.
Follow the steps below to reset your Apple ID password. You can reset it not only from your smartphone but also from your PC browser.
- In a browser such as Safari, open the Apple ID Account Management Page.
- Select the text “Forgot your Apple ID or password?“
- Enter the ID used in iCloud in the top item, enter the “Enter characters in the image” field, and tap “Continue“.
- When you proceed to the next screen, make sure that “Reset password” is checked, and tap “Continue”.
- Select “Email Address” or “Security Question” as the reset method.
- Enter the “Security code” or “answer to your security question” sent by email to reset your password.
- Follow the instructions and enter the “new password” to set it.
If you can reset your password, try updating your Apple ID settings again from the Settings app.
Method 7: Check the service status of your Apple ID
In the past, Apple ID settings could not be updated due to a failure in the Apple ID service.
Therefore, please check if there is a problem with the service status of your Apple ID. You can check the service status of your Apple ID on the official Apple page below.
If there is a problem with the “Apple ID” item, the user cannot handle it, so wait for recovery before trying updating the Apple ID settings.
Method 8: Perform a software update
It is possible that the Apple ID settings cannot be updated due to an old version of iOS or iPad OS.
Therefore, please update your system to the latest version and see if the problem goes away. To update your system, follow these steps:
- Launch the “Settings” app.
- Tap “General“.
- Tap “Software Update“.
- When you find the update, tap “Download and install“.
- Enter your iPhone / iPad passcode.
- Tap “Install Now”.

Once you’ve updated your system to the latest version, make sure you can update your Apple ID settings.
Method 9: Reset all settings
If you’ve tried the solutions above and still can’t update your Apple ID settings, consider resetting your iPhone / iPad settings.
If you reset the iPhone / iPad settings, all the setting information will be returned to the initial state. Follow the steps below to reset the iPhone / iPad settings.
- Launch the “Settings” app.
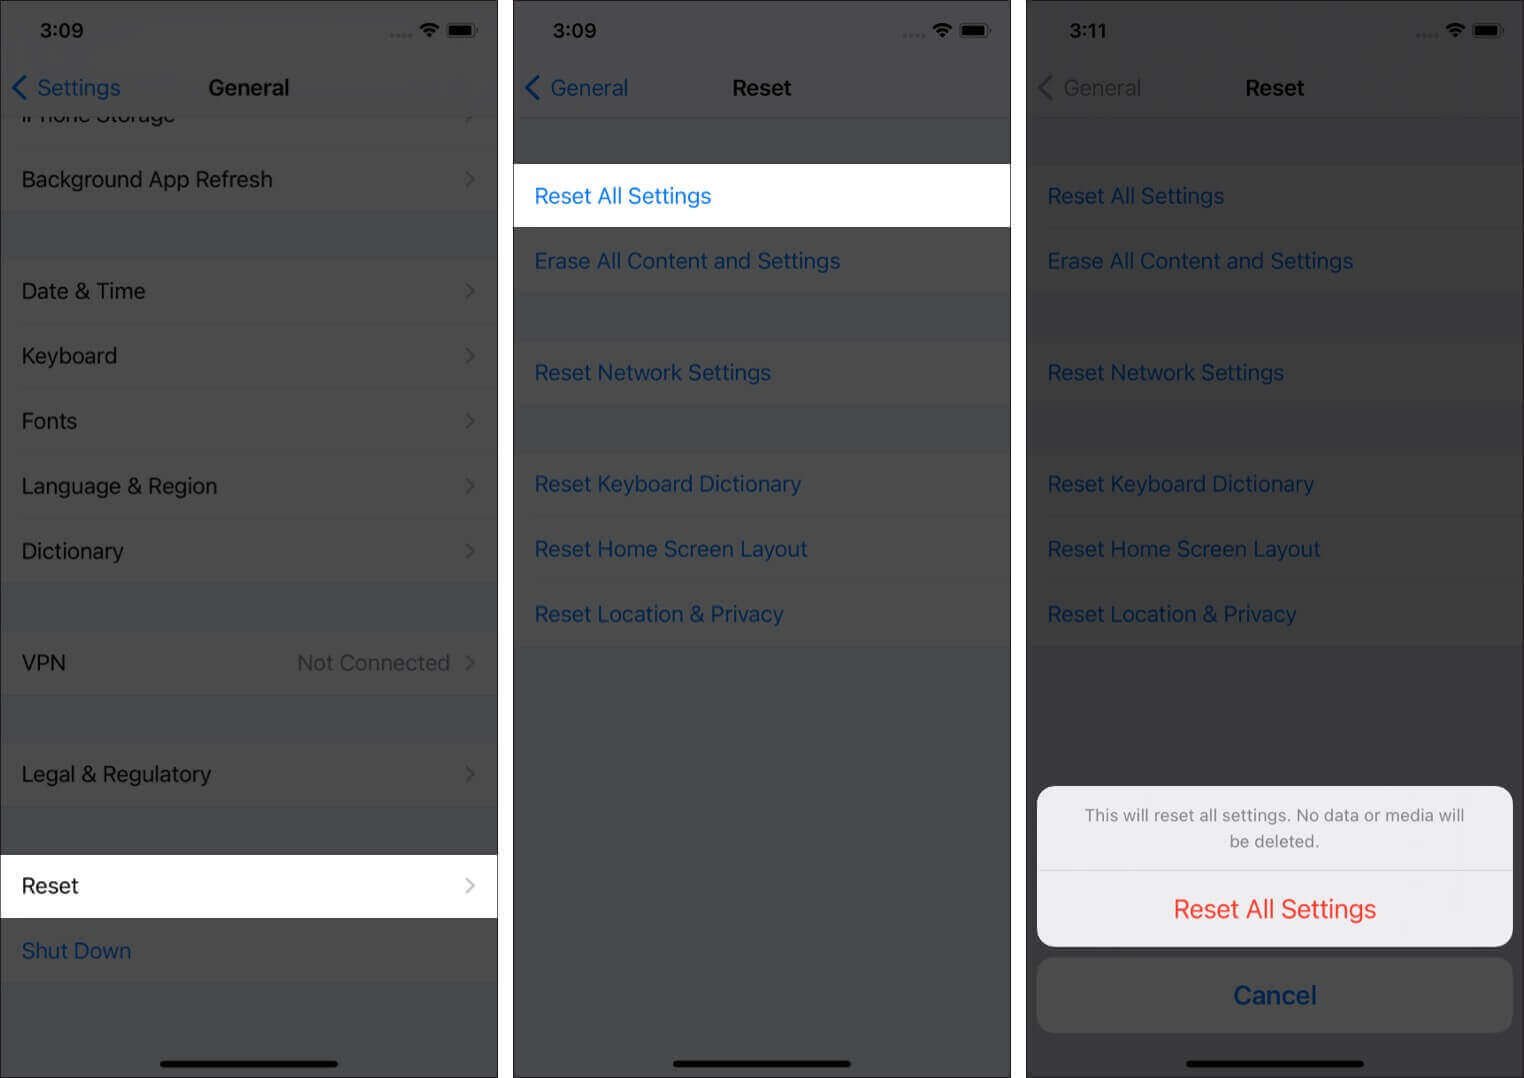
- Tap “General“.
- Tap “Reset“.
- Tap “Reset all settings“.
- Enter your iPhone / iPad passcode.
- When the confirmation pop-up appears, tap Reset All Settings.
- Wait for the iPhone / iPad to restart.
After resetting your iPhone / iPad settings, sign in to your Apple ID and see if the “Update Apple ID Settings” message disappears.