Many Windows laptops have a built-in camera that can be used for web conferencing, live streaming, and more.
However, when you try to use the built-in camera in the app, it may not be displayed in total darkness, or the built-in camera itself may not recognize it.
This article will introduce what to do when the built-in camera of a laptop computer of Windows 10/11 does not appear/recognize.
Action 1: Restart your PC
If your laptop’s built-in camera usually is usable but suddenly disappears, there may be a temporary problem with the driver or system.
Temporary driver and system problems are often resolved by restarting your PC. Therefore, restart your laptop and check if the built-in camera is visible.
If restarting your laptop does not resolve the issue, there are other possible causes, and you should proceed to the next solution.

Action 2: Run the camera troubleshooting tool
Windows implements troubleshooting tools to detect and repair camera problems automatically.
Therefore, if the built-in camera does not appear even after restarting the PC, try running the camera troubleshooting tool. To run the troubleshooting tool, follow these steps:
For Windows 10:
- Start Explorer.
- Go to “C: \ Windows \ diagnostics \ system \ Device”.
- Double-click “DiagPackage.diagpkg” to execute it.
- Follow the wizard to troubleshoot and fix the problem.
For Windows 11:
- Right-click on Windows Mark and select Settings.
- Select System> Troubleshoot.
- Click “More Troubleshooting”.
- Click the “Run” button next to “Camera” from the list.
- Follow the wizard to troubleshoot and fix the problem.
After troubleshooting and fixing the problem with the built-in camera, launch the app to see if the camera looks good.
Action 3: Allow camera privacy settings
In some cases, the app may not appear pitch black due to the privacy settings of the built-in camera not being allowed.
Therefore, make sure that your camera’s privacy settings allow access. To allow the privacy settings for your camera, follow these steps:
- Right-click on Windows Mark and select Settings.
- Click “Privacy and Security”.
- For Windows 10, click “Privacy”.
- Click “Camera” in the app permissions.
- If Allow access to this device’s camera is off, click Change to toggle the switch to on.
- Toggle the “Allow apps to access camera” switch to “On”.
- In the list of apps that can access the camera, switch all apps to “on”.

With the above procedure, you can allow the privacy setting of the camera. Once you’ve allowed the camera to work, open the app and see if you can see the built-in camera.
Action 4: Update the built-in camera driver
- Right-click on Windows Mark and select Device Manager.
- Expand the imagery device tree.
- Right-click “Built-in camera driver name” and click “Update Driver”.
- If you cannot find the driver for the built-in camera, expand the “Camera” tree.
- Click “Search for drivers automatically”.
- The built-in camera driver will be installed automatically.
- If you already have the latest drivers installed, click “Search for updated drivers with Windows Update” to run Windows Update.
After updating the driver for the built-in camera, start the program that uses the camera and check if it looks normal.
NOTE: If you cannot update your built-in camera to a newer version, you may be able to resolve the issue by manually obtaining and installing the latest drivers from the manufacturer's product page.
Action 5: Reinstall the built-in camera driver
There may be cases where the app does not show the camera because the built-in camera driver is damaged.
Therefore, reinstalling and repairing the built-in camera driver may resolve the issue. Follow the steps below to reinstall the built-in camera driver.
- Right-click on Windows Mark and select Device Manager.
- Expand the imagery device tree.
- Right-click “Built-in camera driver name” and click “Uninstall device”.
- If you cannot find the driver for the built-in camera, expand the “Camera” tree.
- When the confirmation dialog is displayed, click “Uninstall”.
- After the uninstallation is complete, restart your PC.
- When the PC restarts, Windows will automatically detect the built-in camera and reinstall the driver.
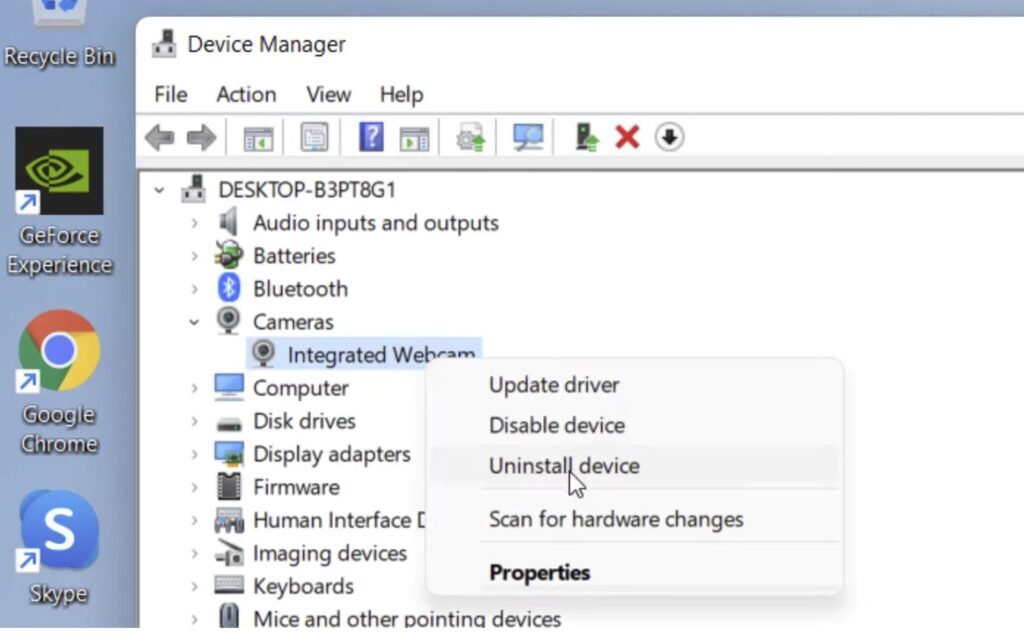
After reinstalling the built-in camera driver, open the app and see if the camera looks good.
Action 6: Cancel the camera privacy mode
For Lenovo laptops such as Thinkpads, the built-in camera may not work because the camera’s privacy mode is enabled.
Therefore, open the Lenovo Settings application and turn off the camera’s privacy mode. To cancel the privacy mode of the camera, follow the procedure below.
- Click “Windows Mark” to launch “Lenovo Vantage”.
- Open “Devices”-> “Device Settings”.
- Toggle the “Camera-Privacy Mode” switch to “Off”.
- If you cannot change the switch, reinstall Lenovo Vantage from the Windows Store.
After canceling the privacy mode of the camera, start the app and check if the built-in camera can be seen usually.
Action 7: Enter the shortcut key of the built-in camera
Some laptop models have a shortcut to enable/disable the built-in camera.
Therefore, enter the shortcut key of the built-in camera to check if the function is enabled.
The shortcut key for enabling / disabling the built-in camera differs depending on the laptop computer, such as “Fn + F6”, “Fn + Space”, and “Fn + F8”.
If you are unsure whether a shortcut is installed or the shortcut key is installed, refer to the manufacturer’s manual or help page.
Action 8: Change the camera settings of the app
If you can’t see the built-in camera only for a specific app, there may be a problem with the app’s camera settings.
Therefore, open the camera settings in the app and ensure that the camera you are using specifies the built-in camera device.
Since the camera settings of the app differ depending on the app, please refer to the app’s help page.

Action 9: Disable the security software
If you are using third-party security software, it is possible that the built-in camera is blocked by the security software function and does not appear.
Therefore, please check if the built-in camera can be used with the third-party security software stopped.
Stop the third-party security software depends on the manufacturer, but in many cases, you can stop it by right-clicking the security software app icon on the right side of the taskbar.
If the problem is solved with the security software stopped, consider changing the security software settings or using another security software.
If not resolved
If you have tried the above solutions and the problem persists, your laptop’s built-in camera may be out of order.
Therefore, consider using an external webcam. The external webcam can be connected to a laptop computer via USB.
If you want to use your laptop’s built-in camera, consider asking the manufacturer or repair shop for diagnosis and repair.